One common misunderstanding I’ve noticed is that people often view React Query primarily as a data-fetching library. I understand this perspective, as it is indeed the most common use case for the library. However, if you take a look at the React Query home page, you will notice that the main description for React Query from its maintainers is “Powerful asynchronous state management” and the library doesn’t care about asynchronous implementation details as long as you return a promise.
With that in mind, we can easily see that the title of this article is somehow incorrect. So instead of trying to find a way to refresh your auth token with React Query, you should focus on the data fetching implementation. In most cases, people tend to use axios, simple fetch, or any other library to fetch data from their API. So we should focus on how to refresh our auth token with those libraries instead of React Query.
For this article, we will use axios as our data-fetching library with React Query. However, the same concept applies to any other library. Even though using axios is highly recommended as it has built-in support for interceptors, which we will use to refresh our authentication token.
As part of this article, we will also cover how to write unit tests for our implementation. Make sure to read the whole article to get the most out of it.
Table of Content
Simple Project Setup
To simplify and focus on the main topic, let’s assume we have a basic app that retrieves user data from an API and displays it in the UI.
import axios from "axios";
export const client = axios.create({ baseURL: "https://test-api.example.com",});import type { AxiosError } from "axios";import { useQuery } from "@tanstack/react-query";
import { client } from "./client";import type { User } from "./types";
type Response = User;
export const useMe = () => useQuery<Response, AxiosError>({ queryKey: ["me"], queryFn: () => client.get(`/user/me`).then(res => res.data), });import { QueryClient, QueryClientProvider } from "@tanstack/react-query";import * as React from "react";import {useMe} from "./use-me";
const queryClient = new QueryClient();
export const App = () => { return ( <QueryClientProvider client={queryClient}> <UserView> </QueryClientProvider> );};
const UserView = () => { const { data, isLoading, error } = useMe();
if(isLoading) return <div>Loading...</div>; if(error) return <div>Something went wrong</div>;
return <div>{data.name}</div>;};As you can see, we have 3 files:
client.tsx: ouraxiosinstance that we will use to fetch data from the API.use-me.tsx: a customuseMehook, which usesuseQueryfrom React Query to fetch the user from the API.app.tsx: our main component that uses theuseMehook to display the user name through theUserViewcomponent.
This setup is pretty simple, but to some extent, it’s mainly how most production apps are structured. Now, let’s see how we can implement the auth token refresh logic.
Refresh auth token implementation
As you may gather from the introduction and to prove my point, we will not touch any React Query code here. Instead, all the work will be done in the client file src/client.tsx.
The first step is to create two new functions to set the token header and remove it from our axios instance.
import axios from "axios";export const client = axios.create({  baseURL: "https://test-api.example.com",});
export const setHeaderToken = (token: string) => {  client.defaults.headers.common.Authorization = `Bearer ${token}`;};
export const removeHeaderToken = () => {  //client.defaults.headers.common.Authorization = null;  delete client.defaults.headers.common.Authorization;};
Normally, those two functions should be called depending on the user’s authentication state. On login, and as we have the token from the API, we need to set it in the headers of the client instance. On logout, we need to remove it.
Now, we need to add a simple library named axios-auth-refresh to refresh our authentication token. This library is a basic axios interceptor that will be triggered whenever we receive a 401 error from the API. This library requires a refresh token function that we need to implement.
pnpm add axios-auth-refreshimport axios from "axios";import createAuthRefreshInterceptor from "axios-auth-refresh";
import { refreshAuth } from "./refresh-auth";
export const client = axios.create({ baseURL: "https://test-api.example.com",});
...
createAuthRefreshInterceptor(client, refreshAuth, { statusCodes: [401], // default: [ 401 ] pauseInstanceWhileRefreshing: true,});To implement the refreshAuth function, we need to create a new file called refresh-auth.ts when we mainly :
- Fetch the new token from the API.
- On success, we set the new token in the failed request headers so that it can be retried. Additionally, we also need to set the new token in our Axios instance for future requests.
- On failure, that means we can’t get a new token from the API. We can return the error and probably redirect the user to the login page, for example, in such cases.
import { client, setHeaderToken } from "./client";
export const fetchNewToken = async () => {  try {    const token: string = await client      .get("https://test-api.example.com/refresh-token")      .then(res => res.data.token);    return token;  } catch (error) {    return null;  }};
export const refreshAuth = async (failedRequest: any) => {  const newToken = await fetchNewToken();
  if (newToken) {    failedRequest.response.config.headers.Authorization = "Bearer " + newToken;    setHeaderToken(newToken);    // you can set your token in storage too    // setToken({ token: newToken });    return Promise.resolve(newToken);  } else {    // you can redirect to login page here    // router.push("/login");    return Promise.reject();  }};
That’s it! Now, whenever we receive a 401 error from the API, the refreshAuth function will be triggered, and we will try to fetch a new token from the API. If we succeed, we will set the new token in the failed request headers and to our axios client instance and try again. If we are unable to obtain a new token, we return an error and redirect the user to the login page.
We can end this article here, but let’s be a good developer and try to add some unit tests to make sure that the code works as expected.
Write Unit tests
Writing unit tests for a React application may require a whole article, but we will try to keep it simple here, and by the end, I will share you with a link to the complete code so you can explore it further.
As a wise person once said, “Don’t test the implementation, test use cases.” So let’s forget about how we implement this and figure out what are the use cases:
-
When everything is fine and we receive a 200 response from the API with user details, the
refreshAuthfunction shouldn’t be called (happy path). -
When sending a request to the API without a header token, we should not call the
refreshAuthfunction and should return an error. This assumes that the token header is required to obtain a new token from the API. -
If the API returns an error other than 401, we should not call the
refreshAuthfunction, and our hook will return the error.(e.g., 500 error) -
When we receive a 401 error from the API, we should call the
refreshAuthfunction, retry the request, and return the user details. -
When we receive a 401 error from the API and are unable to obtain a new token, we should return an error.
We can make sure all those use cases are working as expected by just testing the useMe hook as it’s our main entry point to the API. So let’s get started.
To test the useMe hook, we are going to use react-testing-library with jest to test the useMe hook and nock to mock the API. I assume that you are familiar with those libraries. If not, you can check the links above to learn more about them, or you can comment below if you think I should write more articles about testing.
First, let’s prepare a react-query wrapper for our hook. The only important part is that we need to disable retries for our tests. More details can be found here.
import { QueryClient, QueryClientProvider } from "@tanstack/react-query";import * as React from "react";
// its always good to create a separate instance of query client for tests while testing hooksconst createRQClient = () => {  return new QueryClient({    defaultOptions: {      queries: {        // ✅ turns retries off        retry: false,      },    },  });};
export const createRQWrapper = () => {  const queryClientTest = createRQClient();  return ({ children }: { children: React.ReactNode }) => (    <QueryClientProvider client={queryClientTest}>      {children}    </QueryClientProvider>  );};
Next is to prepare our mock API. We will use nock to mock the API and return the expected response for each use case.
As you may have noticed in the code below; we create multiple mocks for the same API to handle different scenarios. This allows us to easily test various situations without the need to repeatedly write the same code. For example, we can call the mockUserAPI('success') to mock a successful response from the API and mockUserAPI('error') to mock an error response.
import nock from "nock";import type { User } from "./types";
export const nockInstance = (options?: nock.Options) =>  nock(`https://test-api.example.com`, options);
const userMock: Partial<User> = {  email: "test@email.com",  firstName: "test",  lastName: "user",};
type StatusType = "success" | "error";
export const mockUserAPI = (status: StatusType) => {  if (status === "success")    return nockInstance()      .persist() // this is important as on refresh we are calling this api again      .get("/user/me")      .reply(function () {        // eslint-disable-next-line @typescript-eslint/ban-ts-comment        //@ts-ignore        if (this?.req?.headers.authorization === "Bearer valid-token") {          return [200, userMock];        } else {          if (this?.req?.headers?.authorization?.length > 0) {            return [401, { message: "invalid-auth-header" }];          }          return [403, { message: "no-auth-token" }];        }      });  else    return nockInstance()      .get("/user/me")      .reply(500, { message: "server-error" });};
export const mockRefreshTokenAPI = (status: StatusType) => {  if (status === "success")    return nockInstance()      .get("/refresh-token")      .reply(200, { token: "valid-token" });  else    return nockInstance()      .get("/refresh-token")      .reply(403, { message: "token-refresh-error" });};
Now, we can write our tests for our use cases
import nock from "nock";
import { mockRefreshTokenAPI, mockUserAPI } from "./mocks";import { useMe } from "./use-me";import { removeHeaderToken, setHeaderToken } from "./client";import { renderHook, waitFor } from "@testing-library/react";import { createRQWrapper } from "./test-utils";import * as ApiUtils from "./refresh-auth";
const fetchNewTokenSpy = jest.spyOn(ApiUtils, "fetchNewToken");
afterEach(() => { fetchNewTokenSpy.mockClear(); removeHeaderToken(); nock.cleanAll();});
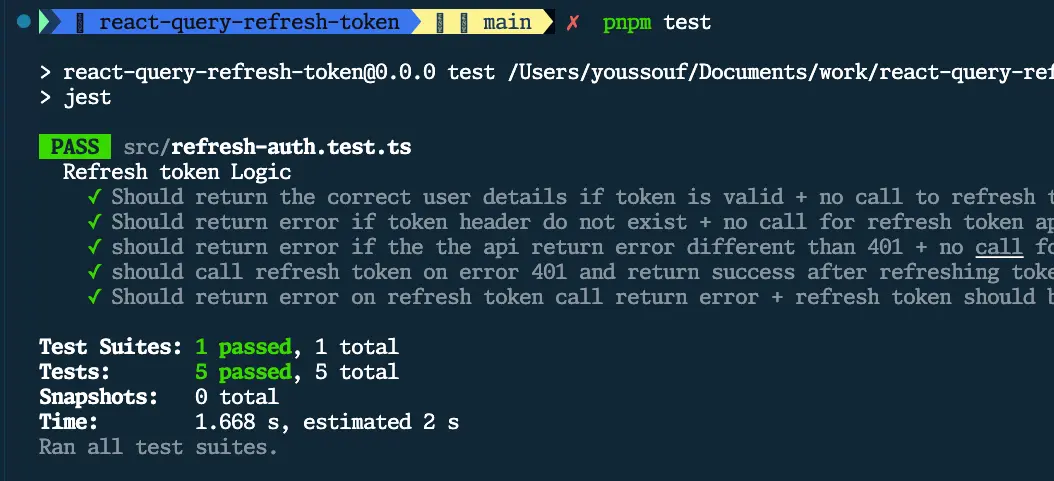
describe("Refresh token Logic", () => { it("Should return the correct user details if token is valid + no call to refresh token", async () => { mockUserAPI("success"); setHeaderToken("valid-token"); const { result } = renderHook(() => useMe(), { wrapper: createRQWrapper(), }); await waitFor(() => { expect(result.current.isSuccess).toBe(true); expect(result.current.data.email).toEqual("test@email.com"); });
expect(fetchNewTokenSpy).toHaveBeenCalledTimes(0); });
it("Should return error if token header do not exist + no call for refresh token api", async () => { mockUserAPI("success"); const { result } = renderHook(() => useMe(), { wrapper: createRQWrapper(), }); await waitFor(() => { expect(result.current.isError).toBe(true); });
expect(fetchNewTokenSpy).toHaveBeenCalledTimes(0); });
it("should return error if the the api return error different than 401 + no call for refresh token api", async () => { mockUserAPI("error"); const { result } = renderHook(() => useMe(), { wrapper: createRQWrapper(), }); await waitFor(() => { expect(result.current.isError).toBe(true); });
expect(fetchNewTokenSpy).toHaveBeenCalledTimes(0); });
it("should call refresh token on error 401 and return success after refreshing token successfully", async () => { mockUserAPI("success"); mockRefreshTokenAPI("success"); setHeaderToken("invalid-valid-token"); const { result } = renderHook(() => useMe(), { wrapper: createRQWrapper(), }); await waitFor(() => { expect(fetchNewTokenSpy).toHaveBeenCalledTimes(1); expect(result.current.isSuccess).toBe(true); expect(result.current.data.email).toEqual("test@email.com"); }); });
it("Should return error on refresh token call return error + refresh token should be called", async () => { mockUserAPI("success"); mockRefreshTokenAPI("error"); setHeaderToken("invalid-valid-token"); const { result } = renderHook(() => useMe(), { wrapper: createRQWrapper(), }); await waitFor(() => { expect(result.current.isError).toBe(true); expect(fetchNewTokenSpy).toHaveBeenCalledTimes(1); }); });});As you can see, we wrote 5 tests to cover all the use cases. For each test, we mock the API response based on the use case and then we execute the useMe hook using renderHook from react-testing-library. Finally, we assert that the hook returns the expected result and that the fetchNewToken function is called when needed.
👉 You can find the complete code on GitHub
That’s it! I hope you enjoyed this article. Make sure to share it with your network so that other people can benefit from it as well. If you have any questions, feel free to comment below, and I will be happy to help.